SIMPLE MASK INSTRUCTIONS
No printable pattern necessary for this one!
MATERIALS
Fabric
Fabric must be light colored, tightly woven, cotton blend, and pre-washed. Patterns are fine. The type used by quilters is ideal. Most of our volunteers have their own stash.
One 10.5” x 7” rectangle (piece A)
Two 7” x 5.25” rectangle pieces (B pieces)
Elastic
Each mask requires 22" of clean elastic. It can be round or flat. 1/8 - 1/4" diameter – maybe the elastic off an old fitted sheet (just make sure it still has some spring in it).
Elastic ALTERNATIVE - Since hundreds of people are now sewing masks, many of the stores are cleaned out of elastic. If you can't get elastic, you can use a sturdy ribbon. Cotton or a cotton blend, not synthetic which won't launder well. It should be light colored. You can make your own ribbon ties out of the same fabric as the masks if you want. They need to be
22" of elastic or sturdy 1/4”-wide ribbon needed per mask
Wire
Each complex mask has a 4" piece of wire for the nose crimp. This wire should be no smaller than 20 gauge, or bigger than 12 gauge. It should be something that can be washed and not rust. Thinner wire can be doubled. Decorative wires, floral wire, picture wire have all been used. Pipe cleaners/chenille stems are allowed but ONLY if you don't have anything else. Please don't use paper clips or twisty ties. Test the cut ends and make sure they are not sharp. You can cut the wire a little longer and curl the ends into small loops to tuck in any sharp ends.
· 4” per mask (extra if needing to curl ends)
Tools
Sewing machine, thread, scissors, ruler, marker, iron
Filters
If we have provided you with filter material, please cut and slide inside of the mask. Otherwise leave one side open for inserting a filter at a later date.
PATTERN & CUTTING
1. Cut fabric to size, elastic, wire. NOTE the pictures show 2 different wires in the steps, either type (floral wire and garden wire) will work. If ends are sharp bend them over.
2. Fold, press and stitch 1/4" hem on the long side of the B pieces.
3. Lay B pieces on top of A piece, right sides together, long edges to long edges, raw edges to raw edges. Center the B pieces on the A piece with the finished edges of B pieces overlapping. It does not matter which B piece is on top. Sew top and bottom edges together with 1/4" seams.
4. Open the flaps, wrong side up and press the seams open. Press the top and bottom edges of the wings too (see arrows). Fold wrong sides together and press mask.
5. Center the 4" cut wire against the top edge of the mask. Mark the length of the wire plus ¼” on each end, with straight pins. Sew a line between the pins, 1/4" down from the edge. The wire channel should be 4.5" long. Close one end of channel by making a 90 degree left turn and sewing up and off the mask. Insert the wire into the channel through the side. Push the wire to the closed end so you have room to sew up the open end.
6. Sew the channel closed with a short seam.
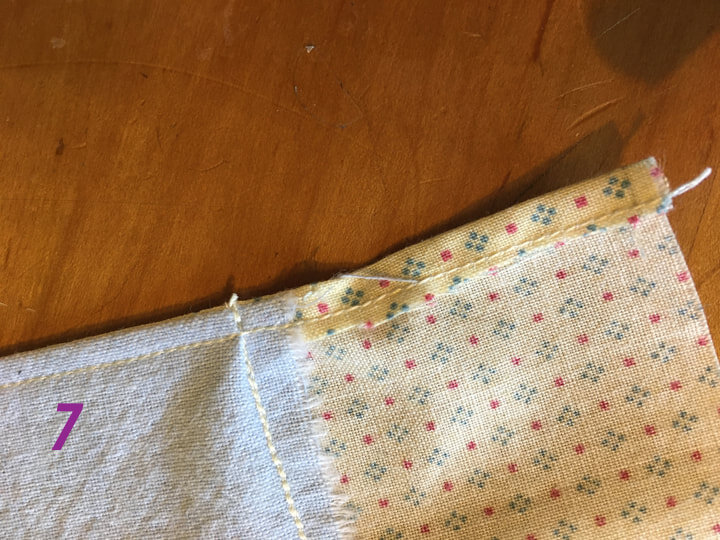
7. Top stitch remaining sections on the top edge of mask, including the pressed and folded ends of piece A. Skip the area around the wire to avoid breaking your needle. Top stitch the bottom edge of the mask all the way across.
8. To make sure the final mask is the right size (so the filters will fit) we recommend making a paper guide for the pleating: Draw two lines across a piece of paper that are 4.5" apart.
9. Pin the top and bottom of the mask to the paper, edges aligned with the guide lines.
10. Gather three horizontal pleats, about 1/4" each, roughly equal distance apart, and pin fabric to fabric (don't pin to the paper).
11. Remove mask from the paper. Sew up the sides of the inner layer (the B pieces) to lock the pleats in place. Press the pleats. Fold and press over 1/4" on the raw edged sides.
12. To make the elastic channel, fold these ends over the raw edge of the inner layer and top stitch in place. Thread the elastic pieces through the channels and tie in loose knots. Use a safety pin if you need, to get it through the channel.
PACKAGING THE MASKS
Put sets into cloth or plastic bags and label the number of masks included. Drop off at a collection site or contact us to arrange pick up.